介绍 (Introduction)
React Navigation is a popular library for routing and navigation in a React Native application.
React Navigation是一个流行的库,用于在React Native应用程序中进行路由和导航。
This library helps solve the problem of navigating between multiple screens and sharing data between them.
该库有助于解决在多个屏幕之间导航以及在它们之间共享数据的问题。
At the end of this tutorial, you will have a rudimentary social network. It will display the number of connections a user has and provide a way to connect with additional friends. You will use this sample application to explore how to navigate mobile application screens using react-navigation.
在本教程的最后,您将拥有一个基本的社交网络。 它将显示用户具有的连接数,并提供与其他朋友连接的方式。 您将使用此示例应用程序来探索如何使用react-navigation导航移动应用程序屏幕。
先决条件 (Prerequisites)
To complete this tutorial, you’ll need:
要完成本教程,您需要:
A local development environment for Node.js. Follow How to Install Node.js and Create a Local Development Environment.
Node.js的本地开发环境。 遵循如何安装Node.js和创建本地开发环境 。
- Familiarity with setting up your environment to create a new React Native project and use the iOS or Android simulators may be beneficial. 熟悉设置环境以创建新的React Native项目并使用iOS或Android模拟器可能会有所帮助。
Note: If you worked with react-navigation in the past, you might encounter some differences. You can consult the documentation for guides on migrating from 3.x and migrating from 4.x.
注意:如果您过去使用过react-navigation ,则可能会遇到一些差异。 您可以查阅文档以获取有关从3.x 迁移和从4.x迁移的指南。
This tutorial was verified with Node v14.7.0, npm v6.14.7, react v16.13.1, react-native v0.63.2, @react-navigation/native v5.7.3, and @react-navigation/stack v5.9.0.
本教程已通过Node v14.7.0, npm v6.14.7, react v16.13.1, react-native v0.63.2, @react-navigation/native v5.7.3和@react-navigation/stack v5.9.0进行了验证。
第1步—创建一个新的React Native App (Step 1 — Creating a New React Native App)
First, create a new React Native app by entering the following command in your terminal:
首先,通过在终端中输入以下命令来创建一个新的React Native应用程序:
npx react-native init MySocialNetwork --version 0.63.2
npx react-native init MySocialNetwork-版本0.63.2
Then, navigate to the new directory:
然后,导航到新目录:
cd MySocialNetwork
cd MySocialNetwork
And start the application for iOS:
并启动适用于iOS的应用程序:
- npm run ios npm运行ios
Alternatively, for Android:
另外,对于Android:
- npm run android npm运行android
Note: If you experience any problems, you may need to consult troubleshooting issues for React Native CLI.
注意:如果遇到任何问题,您可能需要咨询React Native CLI的故障排除问题 。
This will create a skeleton project for you. It doesn’t look much like a social network right now. Let’s fix that.
这将为您创建一个骨架项目。 目前,它看起来不太像社交网络。 让我们修复它。
Open up App.js:
打开App.js :
- nano App.js 纳米App.js
Replace the contents of App.js with the following code to display a welcome message:
用以下代码替换App.js的内容以显示欢迎消息:
import React from 'react';
import { StyleSheet, Text, View } from 'react-native';

class App extends React.Component {
  render() {
    return (
      <View style={styles.container}>
        <Text>Welcome to MySocialNetwork!</Text>
      </View>
    );
  }
}

const styles = StyleSheet.create({
  container: {
    flex: 1,
    backgroundColor: '#fff',
    alignItems: 'center',
    justifyContent: 'center',
  },
});

export default App;
Save the file. Now, when you run the application, a Welcome to MySocialNetwork! message will appear in your simulator.
保存文件。 现在,当您运行该应用程序时, 欢迎使用MySocialNetwork! 消息将出现在您的模拟器中。
In the next step, you will add more screens to your application.
在下一步中,您将向应用程序添加更多屏幕。
步骤2 —创建一个HomeScreen和FriendsScreen (Step 2 — Creating a HomeScreen and FriendsScreen)
Currently, you have a single screen displaying a welcome message. In this step, you will create the two screens for your application: HomeScreen and FriendsScreen.
当前,您只有一个屏幕,显示欢迎消息。 在此步骤中,您将为应用程序创建两个屏幕: HomeScreen和FriendsScreen 。
HomeScreen (HomeScreen)
Your app will need a HomeScreen. The HomeScreen will display the number of friends already in your network.
您的应用将需要一个HomeScreen 。 在HomeScreen将在您的网络中已经显示了好友的号码。
Take the code from App.js and add it to a new file called HomeScreen.js:
从App.js获取代码,并将其添加到名为HomeScreen.js的新文件中:
- cp App.js HomeScreen.js cp App.js HomeScreen.js
Open HomeScreen.js:
打开HomeScreen.js :
- nano HomeScreen.js 纳米HomeScreen.js
Modify HomeScreen.js to use HomeScreen instead of App:
修改HomeScreen.js以使用HomeScreen代替App :
import React from 'react';
import { StyleSheet, Text, View } from 'react-native';
class HomeScreen extends React.Component {
render() {
return (
<View style={styles.container}>
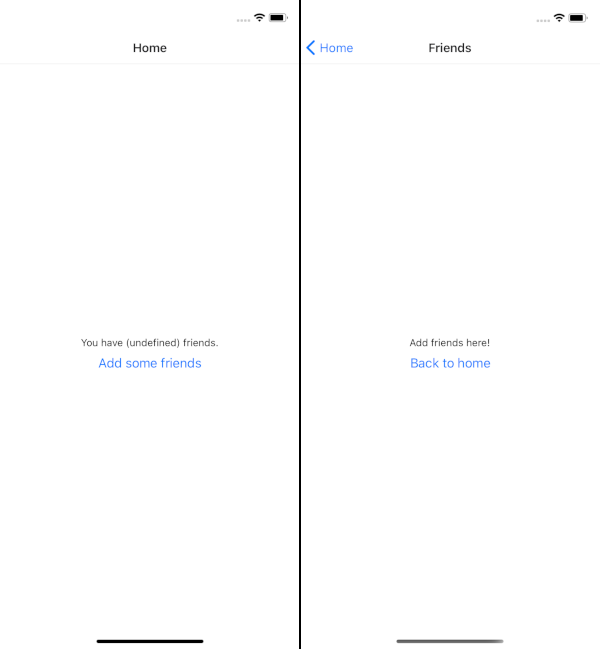
<Text>You have (undefined) friends.</Text>
</View>
);
}
}
// ...
export default HomeScreen;This code will produce a You have (undefined) friends. placeholder message. You will provide a value later.
这段代码将产生一个“ 您有(未定义)朋友”。 占位符消息。 稍后您将提供一个值。
FriendsScreen (FriendsScreen)
Your app will also need a FriendsScreen. On the FriendsScreen you will be able to add new friends.
您的应用还需要一个FriendsScreen 。 在FriendsScreen您可以添加新朋友。
Take the code from App.js and add it to a new file called FriendsScreen.js:
从取码App.js并将其添加到一个名为新文件FriendsScreen.js :
- cp App.js FriendsScreen.js cp App.js FriendsScreen.js
Open FriendsScreen.js:
打开FriendsScreen.js :
- nano FriendsScreen.js 纳米FriendsScreen.js
Modify FriendsScreen.js to use FriendsScreen instead of App:
修改FriendsScreen.js以使用FriendsScreen代替App :
import React from 'react';
import { StyleSheet, Text, View } from 'react-native';

class FriendsScreen extends React.Component {
  render() {
    return (
      <View style={styles.container}>
        <Text>Add friends here!</Text>
      </View>
    );
  }
}

// ...

export default FriendsScreen;
This code will produce an Add friends here! message.
此代码将在此处产生一个添加朋友! 信息。
At this point, you have a HomeScreen and FriendsScreen. However, there is no way to navigate between them. You will build this functionality in the next step.
此时,您有一个HomeScreen和FriendsScreen 。 但是,无法在它们之间进行导航。 您将在下一步中构建此功能。
第3步—将StackNavigator与React导航一起使用 (Step 3 — Using StackNavigator with React Navigation)
For navigating between screens, you will use a StackNavigator. A StackNavigator works exactly like a call stack. Each screen you navigate to is pushed to the top of the stack. Each time you hit the back button, the screens pop off the top of the stack.
为了在屏幕之间导航,您将使用StackNavigator 。 StackNavigator工作原理完全类似于调用堆栈 。 导航到的每个屏幕都被推到堆栈的顶部。 每次您按下“后退”按钮时,屏幕都会弹出堆栈顶部。
First, install @react-navigation/native:
首先,安装@react-navigation/native :
npm install @react-navigation/native@5.7.3
npm安装@ react-navigation / native @ 5.7.3
Then, install @react-navigation/stack and its peer dependencies:
然后,安装@react-navigation/stack及其对等项依赖项:
npm install @react-navigation/stack@5.9.0 @react-native-community/masked-view@0.1.10 react-native-screens@2.10.1 react-native-safe-area-context@3.1.4 react-native-gesture-handler@1.7.0
npm install @ react-navigation / stack @ 5.9.0 @ react-native-community / masked-view @ 0.1.10 react-native-screens @ 2.10.1 react-native-safe-area-context @ 3.1.4 react-本机手势处理程序@ 1.7.0
Note: If you are developing for iOS, you may need to navigate to the ios directory and run pod install.
注意:如果您正在为iOS开发,则可能需要导航到ios目录并运行pod install 。
Next, revisit App.js:
接下来,重新访问App.js :
- nano App.js 纳米App.js
Add NavigationContainer and createStackNavigator to App.js:
将NavigationContainer和createStackNavigator添加到App.js :
import 'react-native-gesture-handler';
import React from 'react';
import { StyleSheet } from 'react-native';
import { NavigationContainer } from '@react-navigation/native';
import { createStackNavigator } from '@react-navigation/stack';

const Stack = createStackNavigator();
Then, replace the contents of render:
然后,替换render的内容:
// ...

class App extends React.Component {
  render() {
    return (
      <NavigationContainer>
        <Stack.Navigator>
        </Stack.Navigator>
      </NavigationContainer>
    );
  }
}

// ...
Nested inside <Stack.Navigator>, add the HomeScreen:
嵌套在<Stack.Navigator> ,添加HomeScreen :
import 'react-native-gesture-handler';
import React from 'react';
import { StyleSheet } from 'react-native';
import { NavigationContainer } from '@react-navigation/native';
import { createStackNavigator } from '@react-navigation/stack';
import HomeScreen from './HomeScreen';

const Stack = createStackNavigator();

class App extends React.Component {
  render() {
    return (
      <NavigationContainer>
        <Stack.Navigator>
          <Stack.Screen
            name="Home"
            component={HomeScreen}
          />
        </Stack.Navigator>
      </NavigationContainer>
    );
  }
}

// ...
This code creates a very small stack for your navigator with only one screen: HomeScreen.
此代码仅使用一个屏幕为HomeScreen创建一个很小的堆栈。
Nested inside <Stack.Navigator>, add the FriendsScreen:
嵌套内部<Stack.Navigator>添加FriendsScreen :
import 'react-native-gesture-handler';
import React from 'react';
import { StyleSheet } from 'react-native';
import { NavigationContainer } from '@react-navigation/native';
import { createStackNavigator } from '@react-navigation/stack';
import HomeScreen from './HomeScreen';
import FriendsScreen from './FriendsScreen';

const Stack = createStackNavigator();

class App extends React.Component {
  render() {
    return (
      <NavigationContainer>
        <Stack.Navigator>
          <Stack.Screen
            name="Home"
            component={HomeScreen}
          />
          <Stack.Screen
            name="Friends"
            component={FriendsScreen}
          />
        </Stack.Navigator>
      </NavigationContainer>
    );
  }
}

// ...
This code adds the FriendsScreen to the navigator.
此代码将FriendsScreen添加到导航器。
Note: This differs from how createStackNavigator was used in previous versions of React Navigation.
注意:这与以前版本的React Navigation中使用createStackNavigator不同。
Now, the navigator is aware of your two screens.
现在,导航器知道了您的两个屏幕。
向主HomeScreen和FriendsScreen HomeScreen添加按钮 (Adding Buttons to HomeScreen and FriendsScreen)
Finally, add buttons to take you between your two screens.
最后,添加按钮以在两个屏幕之间切换。
In HomeScreen.js, add the following code:
在HomeScreen.js ,添加以下代码:
import React from 'react';
import { StyleSheet, Text, View, Button } from 'react-native';

class HomeScreen extends React.Component {
  render() {
    return (
      <View style={styles.container}>
        <Text>You have (undefined) friends.</Text>

        <Button
          title="Add some friends"
          onPress={() =>
            this.props.navigation.navigate('Friends')
          }
        />
      </View>
    );
  }
}

// ...
In FriendsScreen.js, add the following code:
在FriendsScreen.js ,添加以下代码:
import React from 'react';
import { StyleSheet, Text, View, Button } from 'react-native';

class FriendsScreen extends React.Component {
  render() {
    return (
      <View style={styles.container}>
        <Text>Add friends here!</Text>

        <Button
          title="Back to home"
          onPress={() =>
            this.props.navigation.navigate('Home')
          }
        />
      </View>
    );
  }
}

// ...
Let’s talk about this.props.navigation. As long as your screen is included in the StackNavigator, it automatically inherits many useful props from the navigation object. In this case, you used navigate to move to a different page.
让我们来谈谈this.props.navigation 。 只要您的屏幕包含在StackNavigator ,它就会自动从navigation对象继承许多有用的道具。 在这种情况下,您使用navigate来移动到另一个页面。
If you open your simulator now, you can navigate between the HomeScreen and FriendsScreen.
如果现在打开模拟器,则可以在HomeScreen和FriendsScreen之间导航。
步骤4 —使用Context将数据传递到其他屏幕 (Step 4 — Using Context to Pass Data to Other Screens)
In this step, you will create an array of possible friends — Alice, Bob, and Sammy — and an empty array of current friends. You will also create functionality for the user to add possible friends to their current friends.
在此步骤中,您将创建一个可能的朋友数组Alice , Bob和Sammy以及一个空数组的当前朋友。 您还将为用户创建将可能的朋友添加到其当前朋友的功能。
Open App.js:
打开App.js :
- nano App.js 纳米App.js
Add possibleFriends and currentFriends to the component’s state:
添加possibleFriends和currentFriends到组件的状态:
// ...

class App extends React.Component {
  constructor(props) {
    super(props)
    this.state = {
      possibleFriends: [
        'Alice',
        'Bob',
        'Sammy',
      ],
      currentFriends: [],
    }
  }

  // ...
}

// ...
Next, add a function to move a possible friend into the list of current friends:
接下来,添加一个功能以将可能的朋友移至当前朋友列表中:
// ...

class App extends React.Component {
  constructor(props) {
    super(props)
    this.state = {
      possibleFriends: [
        'Alice',
        'Bob',
        'Sammy',
      ],
      currentFriends: [],
    }
  }

  addFriend = (index) => {
    const {
      currentFriends,
      possibleFriends,
    } = this.state

    // Pull friend out of possibleFriends
    const addedFriend = possibleFriends.splice(index, 1)

    // And put friend in currentFriends
    currentFriends.push(addedFriend)

    // Finally, update the app state
    this.setState({
      currentFriends,
      possibleFriends,
    })
  }

  // ...
}

// ...
At this point, you have finished building the functionality to add friends.
至此,您已经完成了添加好友的功能。
将FriendsContext添加到App (Adding FriendsContext to App)
Now you can add friends in App.js, but you will want to add them to FriendsScreen.js and have them display in HomeScreen.js. Since this project is built with React, you can inject this functionality into your screens with context.
现在,您可以添加好友App.js ,但你会希望将其添加到FriendsScreen.js ,并让他们在显示HomeScreen.js 。 由于该项目是使用React构建的,因此您可以将此功能与上下文一起注入到屏幕中。
Note: In previous versions of React Navigation, it was possible to use screenProps to share data between screens. In the current version of React Navigation, it is recommended to use React Context to share data between screens.
注意:在以前版本的React Navigation中,可以使用screenProps在屏幕之间共享数据。 在当前版本的React Navigation中,建议使用React Context在屏幕之间共享数据。
To avoid a circular reference, you will want a new FriendsContext file:
为了避免循环引用,您将需要一个新的FriendsContext文件:
- nano FriendsContext.js 纳米FriendsContext.js
Export FriendsContext:
导出FriendsContext :
import React from 'react';

export const FriendsContext = React.createContext();
Open App.js:
打开App.js :
- nano App.js 纳米App.js
Add the FriendsContext:
添加FriendsContext :
import 'react-native-gesture-handler';
import React from 'react';
import { StyleSheet } from 'react-native';
import { NavigationContainer } from '@react-navigation/native';
import { createStackNavigator } from '@react-navigation/stack';
import { FriendsContext } from './FriendsContext';
import Home from './Home';
import Friends from './Friends';

const Stack = createStackNavigator();

class App extends React.Component {
  // ...

  render() {
    return (
      <FriendsContext.Provider>
        <NavigationContainer>
          <Stack.Navigator>
            <Stack.Screen
              name="Home"
              component={Home}
            />
            <Stack.Screen
              name="Friends"
              component={Friends}
            />
          </Stack.Navigator>
        </NavigationContainer>
      </FriendsContext.Provider>
    );
  }
}

// ...
This code establishes FriendsContext as a new Context object and wraps the NavigationContainer in a Context.Provider component so any children in the component tree can subscribe to context changes.
此代码将FriendsContext建立为新的Context对象 ,并将NavigationContainer包装在Context.Provider组件中,以便组件树中的所有子代都可以订阅上下文更改。
Since you are no longer using View or Text, it is possible to remove those imports from react-native.
由于不再使用View或Text ,因此可以从react-native删除这些导入。
You will need to provide a value to make data accessible by consumers:
您将需要提供一个value以使使用者可以访问数据:
// ...

class App extends React.Component {
  // ...

  render() {
    return (
      <FriendsContext.Provider
        value={
          {
            currentFriends: this.state.currentFriends,
            possibleFriends: this.state.possibleFriends,
            addFriend: this.addFriend
          }
        }
      >
        <NavigationContainer>
          <Stack.Navigator>
            <Stack.Screen
              name="Home"
              component={Home}
            />
            <Stack.Screen
              name="Friends"
              component={Friends}
            />
          </Stack.Navigator>
        </NavigationContainer>
      </FriendsContext.Provider>
    );
  }
}

// ...
This will allow the HomeScreen and FriendsScreen to reference any context changes to currentFriends and possibleFriends.
这将允许HomeScreen和FriendsScreen引用任何上下文更改到currentFriends和possibleFriends currentFriends 。
Now you can work on referencing the context in your screens.
现在,您可以在屏幕上引用上下文。
添加FriendsContext到HomeScreen (Adding FriendsContext to HomeScreen)
In this step, you will set up the application to display the current friend count.
在此步骤中,您将设置应用程序以显示当前的朋友计数。
Open HomeScreen.js:
打开HomeScreen.js :
- nano HomeScreen.js 纳米HomeScreen.js
And add the FriendsContext:
并添加FriendsContext :
import React from 'react';
import { StyleSheet, Text, View, Button } from 'react-native';
import { FriendsContext } from './FriendsContext';

class HomeScreen extends React.Component {
  // ...
}
HomeScreen.contextType = FriendsContext;

// ...
This code establishes a Class.contextType. You can now access context in your screens.
此代码建立一个Class.contextType 。 现在,您可以在屏幕中访问上下文。
For instance, let’s make your HomeScreen display how many currentFriends you have:
举例来说,我们让您的HomeScreen显示有多少currentFriends您有:
import React from 'react';
import { StyleSheet, Text, View, Button } from 'react-native';
import { FriendsContext } from './FriendsContext';

class Home extends React.Component {
  render() {
    return (
      <View style={styles.container}>
        <Text>You have { this.context.currentFriends.length } friends!</Text>

        <Button
          title="Add some friends"
          onPress={() =>
            this.props.navigation.navigate('Friends')
          }
        />
      </View>
    );
  }
}
HomeScreen.contextType = FriendsContext;

// ...
If you open your app up again in the simulator and view the HomeScreen, you will see the message: You have 0 friends!.
如果您在模拟器中再次打开您的应用程序并查看HomeScreen ,则会看到以下消息: 您有0个朋友! 。
添加FriendsContext到FriendsScreen (Adding FriendsContext to FriendsScreen)
In this step, you will set up the application to display the possible friends and provide buttons for adding them to the current friends.
在此步骤中,您将设置应用程序以显示可能的朋友,并提供用于将其添加到当前朋友的按钮。
Next, open FriendsScreen.js:
接下来,打开FriendsScreen.js :
- nano FriendsScreen.js 纳米FriendsScreen.js
And add the FriendsContext:
并添加FriendsContext :
import React from 'react';
import { StyleSheet, Text, View, Button } from 'react-native';
import { FriendsContext } from './FriendsContext';

class FriendsScreen extends React.Component {
  // ...
}
FriendsScreen.contextType = FriendsContext;

// ...
This code establishes a Class.contextType.
此代码建立一个Class.contextType 。
Now, create a button to add friends in FriendsScreen.js:
现在,创建一个按钮以在FriendsScreen.js添加朋友:
import React from 'react';
import { StyleSheet, Text, View, Button } from 'react-native';
import { FriendsContext } from './FriendsContext';

class Friends extends React.Component {
  render() {
    return (
      <View style={styles.container}>
        <Text>Add friends here!</Text>

        {
          this.context.possibleFriends.map((friend, index) => (
            <Button
              key={ friend }
              title={ `Add ${ friend }` }
              onPress={() =>
                this.context.addFriend(index)
              }
            />
          ))
        }

        <Button
          title="Back to home"
          onPress={() =>
            this.props.navigation.navigate('Home')
          }
        />
      </View>
    );
  }
}
FriendsScreen.contextType = FriendsContext;

// ...
If you open your app up again in the simulator and view the FriendsScreen, you will see a list of friends to add.
如果您在模拟器中再次打开应用程序并查看FriendsScreen ,则会看到要添加的朋友列表。
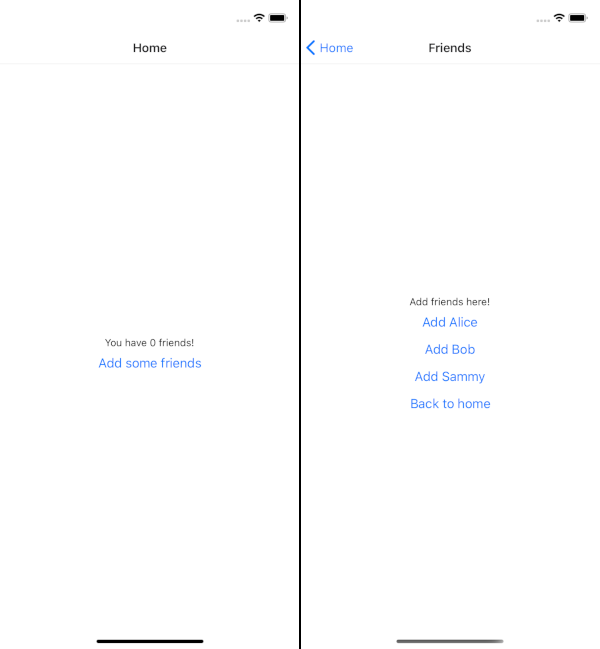
If you visit the FriendsScreen and click on the button to add friends, you will see the list of possibleFriends decrease. If you visit the HomeScreen, you will see the number of friends increase.
如果您访问FriendsScreen并单击按钮添加朋友,您将看到“ possibleFriends朋友”列表减少。 如果您访问HomeScreen ,您会看到朋友数量增加。
You can now navigate between screens and share data between them.
您现在可以在屏幕之间导航并在屏幕之间共享数据。
结论 (Conclusion)
In this tutorial, you have created a sample React Native application with multiple screens. Using React Navigation, you devised a way to navigate between screens. Using React Context, you developed a way to share data between screens.
在本教程中,您创建了一个带有多个屏幕的示例React Native应用程序。 使用React Navigation,您设计了一种在屏幕之间导航的方法。 使用React Context,您开发了一种在屏幕之间共享数据的方法。
The complete source code for this tutorial is available on GitHub.
本教程的完整源代码可在GitHub上找到 。
If you want to dig deeper into React Navigation, check out their documentation.
如果您想更深入地了解React Navigation,请查看其文档 。
React Navigation is not the only routing and navigation solution. There is also React Native Navigation, React Native Router Flux, and React Router Native.
React Navigation不是唯一的路由和导航解决方案。 还有React Native导航 , React Native Router Flux和React Router Native 。
If you’d like to learn more about React, take a look at our How To Code in React.js series, or check out our React topic page for exercises and programming projects.
如果您想了解有关React的更多信息,请查看我们的React.js系列中的How To Code ,或查看我们的React主题页面以获取练习和编程项目。
翻译自: https://www.digitalocean.com/community/tutorials/react-react-native-navigation